Features
Business intelligence
Contracting
Northern Lights
Daylighting options expand with channel glass
February 13, 2009 By Jeff Razwick
With a cool climate and most of its land closer to the North Pole than
the equator, many may overlook the strong opportunities for using
daylighting designs in Canada’s buildings. However, architects,
glaziers and other building professionals can take advantage of
daylighting benefits that are commonly realized in more southern
locations.
Daylighting options expand with channel glass.

|
|
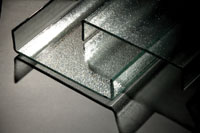
| Channel glass systems, such as Pilkington Profilit, consist of self-supporting “U”-shaped cast-glass channels mounted in an extruded metal perimeter frame.
|
With a cool climate and most of its land closer to the North Pole than the equator, many may overlook the strong opportunities for using daylighting designs in Canada’s buildings. However, architects, glaziers and other building professionals can take advantage of daylighting benefits that are commonly realized in more southern locations.
Daylighting is a deliberate and integrated design strategy that uses sunlight to illuminate interior spaces. The goal is to reduce energy use and improve the productivity of people inside the building, as well as their well-being. Building owners and employers, in turn, receive substantial monetary benefits.
According to the Daylighting Guide for Canadian Commercial Buildings published by Public Works and Government Services Canada, there are several factors that make Canadian buildings well-suited for daylighting. First, Canadians spend much of their time indoors during the winter. Second, daylighting works best with diffused, rather than direct, sunlight because this helps overcome challenges with heat gain/loss and glare.
 |
|
| The framing system and narrow glass channels allow formation of straight walls, or curved and serpentine walls. | |
 |
|
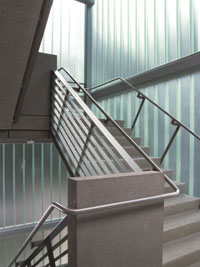
| The channels come in lengths up to seven metres and can be installed vertically or horizontally. In vertical installations, channel glass typically does not require intermediate mullions. | |
 |
Illumination from the sun is sufficient for daylighting in all but extreme northern areas of the country where short days prevail for extended periods. At 46 degrees north latitude, where most people live, average solar lighting under overcast skies is about 15 times greater than required for typical indoor tasks.
The keys to effective daylighting are to capture sufficient natural light, while avoiding the problems of too much light. While daylighting design guides frequently discuss the use of various classes of window glazing, alternative glazing materials now available in North America are expanding the options.
Notable among these is channel glass. Its unique properties provide a clear way to overcome the challenges of daylighting in cold climates.
Responding to daylight
A range of studies detail the benefits to building users and owners from daylighting. The Daylighting Guide for Canadian Commercial Buildings summarizes the advantages as: improved lighting quality, better occupant comfort and health, increased productivity and retail sales, reduced auxiliary lighting load, reduced cooling load and reduced peak electricity demand.
People also respond better to full-spectrum natural light than the artificial light created by incandescent or fluorescent lights.
In addition to the benefits for building occupants, daylighting provides energy savings which is helpful to both the environment and for reducing building operating costs.
Studies suggest that daylighting can reduce total energy costs for commercial buildings by up to one third. Savings come from reduced reliance on electric lights, less need for heating on colder days, and diminished cooling system requirements to offset waste heat from artificial lights.
Effective daylighting requires more than adding windows. It is a careful balance between capturing light, managing glare, and supplementing illumination with controlled artificial lighting. For buildings in colder climates, addressing heat loss through the glazed area is crucial.
Direct sunlight can distract building users and offset the benefits of receiving natural light. Glares on windows and computer screens are particularly annoying. Likewise, direct sunlight can raise interior temperatures uncomfortably or require additional costs for cooling. Designers can overcome these problems with building design and placement, automated systems, and selection of construction materials.
In addition, achieving the energy savings from reduced lighting requires co-ordination between glazing design and lighting control systems. If a building captures natural light but doesn’t have automated systems to reduce artificial lighting, the result can be a net increase in costs due to higher cooling demands.
For winter months, in particular, the glazing must also be designed to reduce heat loss since glass tends to transfer heat at a higher rate than other building materials such as wood and concrete.
 |
|
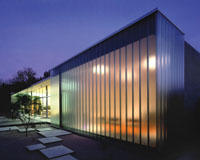
| Coloured and textured channel glass, with varying translucency, lets in natural light without the loss of privacy. |
|
 |
|
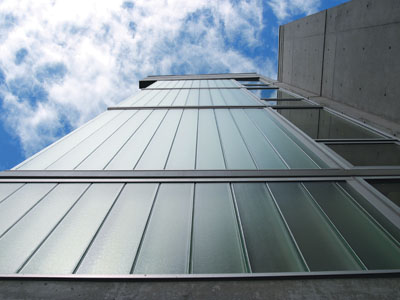
| Designers are able to create large, uninterrupted areas of glazing for interiors or exteriors, which works especially well for capturing daylight.
|
Channel glass
Many design professionals are accustomed to using specialty glazing for daylighting applications. High-performance, energy-efficient windows help lower heat gain/loss. Coatings, films and tints can diffuse light and reduce glare. At the same time, more daylighting designs rely on alternatives to traditional window glass.
For example, channel glass is increasingly being used given its unique abilities to fulfill daylighting needs.
Channel glass systems, such as Pilkington Profilit, consist of self-supporting “U”-shaped cast-glass channels mounted in an extruded metal perimeter frame. The channels come in lengths up to seven metres and can be installed vertically or horizontally. In vertical installations, channel glass typically does not require intermediate mullions.
The framing system and narrow glass channels allow formation of straight walls, or curved and serpentine walls with tight radii (as low as two metres). These various properties enable designers to create large, uninterrupted areas of glazing for interiors or exteriors, which works especially well for capturing daylight.
In addition, channel glass performs very well on one of the specific window placement recommendations identified in the Daylighting Guide for Canadian Commercial Buildings: using strip windows for uniform office lighting. An uninterrupted span of glazing provides sufficient lighting to a room without contrasting shadows as is typical with individual window openings.
Channel glass is also available in a variety of colours and textures with varying translucency, allowing for the passage of natural light without the loss of privacy. It provides warm, diffused light for interior spaces without glare.
Energy efficiency
The configuration of channel glass systems helps them reduce heat gain/loss. The individual glass channels are mounted in an overlapping fashion, creating an insulating air-filled space. Thermally broken frames are also available to reduce heat bridging. The U-value of the glazing and framing system is 0.53. The glass is also available in a Low-E variety with a system U value of 0.42.
To further enhance energy performance, insulating aerogel can be placed in the enclosed space between the channels to reduce the system U-value to 0.32. Products such as Nanogel aerogel are translucent and helps promote soft, even light dispersion, while reducing condensation and unwanted noise. This advanced material is sometimes called “frozen smoke” since it is one of the world’s lightest solids.
Channel glass systems have been used in Europe for more than 30 years, where they have performed very well in cold, northern climates.
For architects, designers and glaziers, realizing the benefits of daylighting does not need to be difficult, but does require careful planning. Numerous design guides are available in print and online, and professional courses are available to learn the nuances. When incorporating daylighting design concepts, remember that alternative glazing systems may be especially suited for the specific design challenges.
*Jeff Razwick is the vice-president of business development for Technical Glass Products (TGP), a supplier of fire-rated glass and framing systems, along with specialty architectural glazing products. He writes frequently about the design and specification of glazing systems for commercial buildings. He can be reached at: jeffr@fireglass.com.
| Installing Channel Glass While not difficult or complex for a professional glazier to install, channel glass requires specific procedures for proper installation. In some cases, these differ from steps used with window glass. Here are some general installation tips for a typical, exterior, vertical application. Be sure to consult the supplier’s documentation for specific methods and requirements. Measuring frames Measure the opening sizes and cut the head, sill and jamb sections taking into account caulking bead clearance requirements and frame expansion. Miter or cope and butt the joints at the head. Cope and butt joints at the sill. Attaching frames Cutting channel glass Place the glass channel on a flat surface, preferably cushioned with felt or other suitable materials. With the flanges pointed upward, cut the glass channels by hand or with a special saw. To cut by hand, use a cutting template or straight edge to ensure a straight cut. Begin by scoring the flange farthest away, starting at the corner and working upwards; return back to the corner of origin and start the cut across the face of the glass and continue up the flange closest to the cutter in one continuous motion. Make a light glancing blow to the top edge of the flange opposite the cut on each side of the glass channel. Place the glass-cutting tool under the glass channel and apply light pressure to the flanges of the glass to snap it cleanly across the cut line. Seam the ends of the glass with a disc or belt sander specifically designed for glass edging, taking special care to smooth any irregularities caused by cutting. Installing glass Sealing the system |
Print this page
Leave a Reply